Follow these steps to set up automatic stat tracking for your streams.
Requirements
- Windows 10/11 computer
- OBS Studio
- Stream Deck (recommended for easy controls)
- Purple+ license - Subscribe to unlock these features →
Install GameStats
EasyDownload and run our all-in-one installer that automatically sets up everything you need.
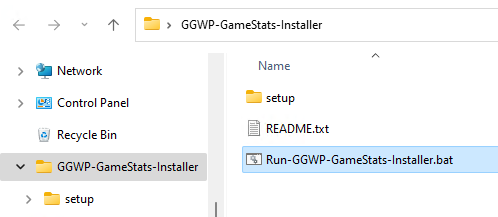
- Download the "GGWP.Live GameStats Installer" zip file from the downloads page
- Extract the zip file to a temporary location (like your Desktop or Downloads folder)
- Double-click "Run-GGWP-GameStats-Installer.bat" to start the installation:
- Click "Yes" when Windows asks for administrator privileges
- The installer will automatically:
- Install Tesseract OCR (if not already installed)
- Install Streamer.bot to
C:\Streamer.bot\(if not already installed) - Copy GGWP DLLs and GameStats files
- Create "Streamer.bot" desktop shortcut
- Wait for the "Installation completed successfully!" message:
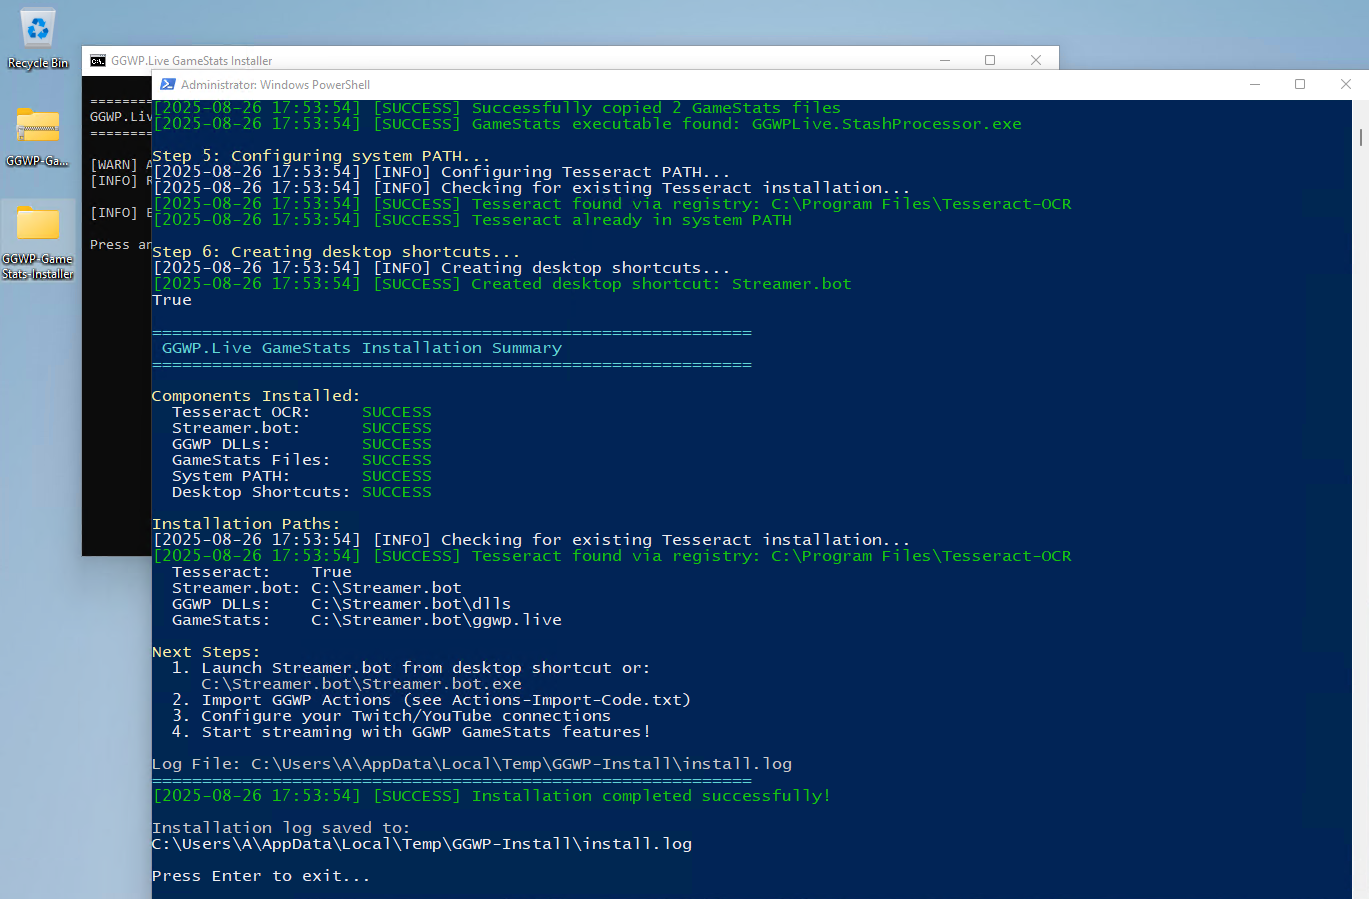
Note: The installer is safe to run multiple times (i.e. for upgrades) and won't overwrite your existing Streamer.bot settings.
Download API & License Keys
EasyYour API key enables the software to update your statistics. Your license determines which features you can access.
2a. Download API Key
- Go to your licensing page and download
config.json - Save the API file to:
C:\Streamer.bot\ggwp.live\config.json
2b. Download License Key
- Go to your licensing page and download
ggwp_license.json - Save the license file to:
C:\Streamer.bot\ggwp.live\ggwp_license.json
Important: Keep your API Key and License file secure and don't share them with others.
Configure Streamer.bot
MediumStreamer.bot is the core application that connects everything together. We installed this in Step 1.
3a. Configure Streamer.bot
- Follow the "Initial Setup Guide" link above to connect Streamer.bot to your OBS instance, and connect your streaming platform(s)
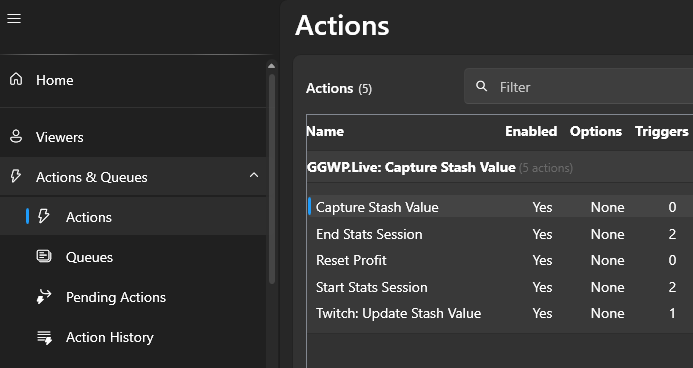
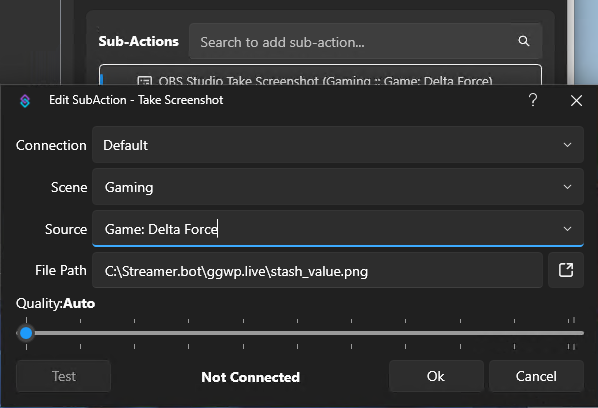
3b. Link "Capture Stash Value" Action to Your Game
Configure your game capture settings: Streamer.bot needs to know your OBS Scene and Source for game capture:
- In Actions select "Capture Stash Value"
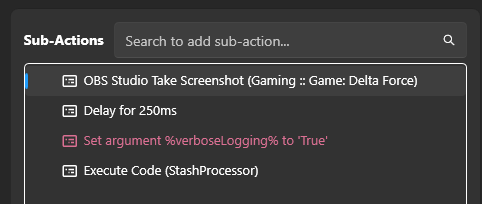
- Double-click the first sub-action "OBS Studio Take Screenshot..."
- Select your OBS Scene and Source which has your game capture and click OK:
3c. Choose Stats Session Trigger Method
You can have your stats session start automatically or control it manually:
Auto-Start (default)
Automatically starts your stats session when OBS goes Live or starts Recording
Manual Control
Use Stream Deck buttons to control stats session
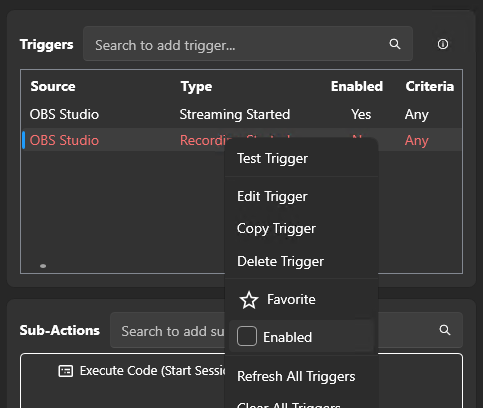
- If you prefer manual control, disable the Trigger for both the "Start Stats Session" and "End Stats Session" Actions:
3d. Keyboard Shortcut for Capturing Stash Value
A keyboard shortcut is pre-configured so you can capture your stash value without a Stream Deck. By default, the shortcut is:
- Press Shift + Right Arrow while Delta Force is open and your stash screen is visible to capture your stash value
- You can customise this shortcut: in Streamer.bot, open the "Capture Stash Value" Action, go to Triggers, and edit the hotkey combination to whatever works best for you
Important: For keyboard shortcuts to work consistently while Delta Force is in focus, Streamer.bot must be running as Administrator. Right-click the Streamer.bot shortcut and select "Run as administrator", or set this permanently via Properties → Compatibility → Run this program as an administrator.
You can right click the taskbar icon for Streamer.bot and 'Pin to taskbar' for ease of use to open next time.
Configure Stream Deck (Optional)
MediumIf you have a Stream Deck, you can set up physical buttons for controlling your stats tracking. This step is optional - the keyboard shortcut configured in Step 3d is the easiest way to capture your stash value and works without a Stream Deck.
Install Streamer.bot plugin Configure Streamer.bot instance4a. Install Streamer.bot Plugin
- Open Stream Deck software
- Follow the instructions in the "Install Streamer.bot plugin" link above
4b. Configure Streamer.bot Instance
- Follow the instructions in the "Configure Streamer.bot instance" link above
4c. Create Control Buttons
"Capture Stash" Button
- Drag Streamer.bot "Action" to a spare Stream Deck button:
- Under the button's Actions choose an "Action:" of "Capture Stash Value" (the dropdown lists all the Actions from Streamer.bot - if it's not listing any actions then you probably need to "Configure Streamer.bot instance" - link above):
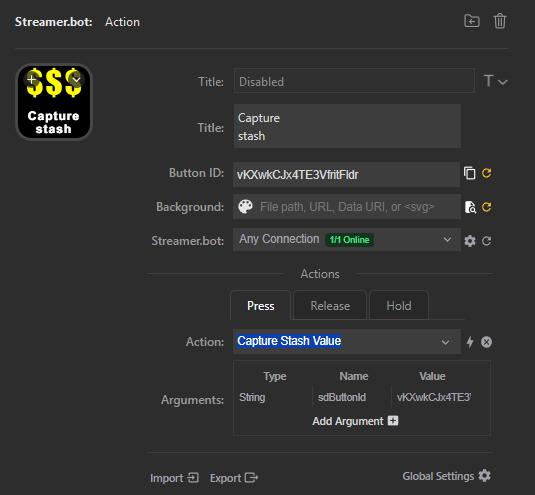
- Set custom icon:
 (right click the image above and choose "Save image as..." to download locally and set as your Stream Deck button)
"Start/End Stats" Buttons (Optional)
Only if you chose "Manual Control" in Step 3c
- Create action: "Start Stats Session":
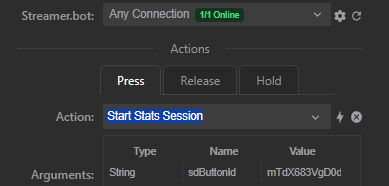
- Repeat the above step with another Stream Deck button for the "End Stats Session"
Test Your Setup
Easy- Verify everything is working correctly before going live.
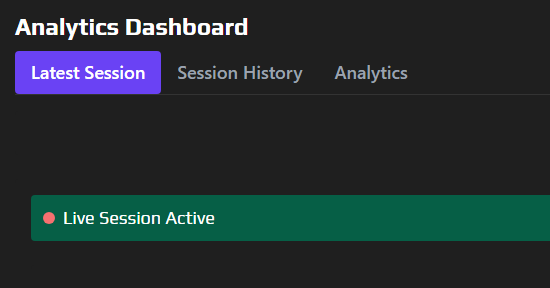
- The easiest way to test your stats session is by clicking "Start Recording" button in OBS (by default we start a stats session when OBS is live or recording, ref Step 5d).
- Then go to your page and you should see that your stats session is "Live":
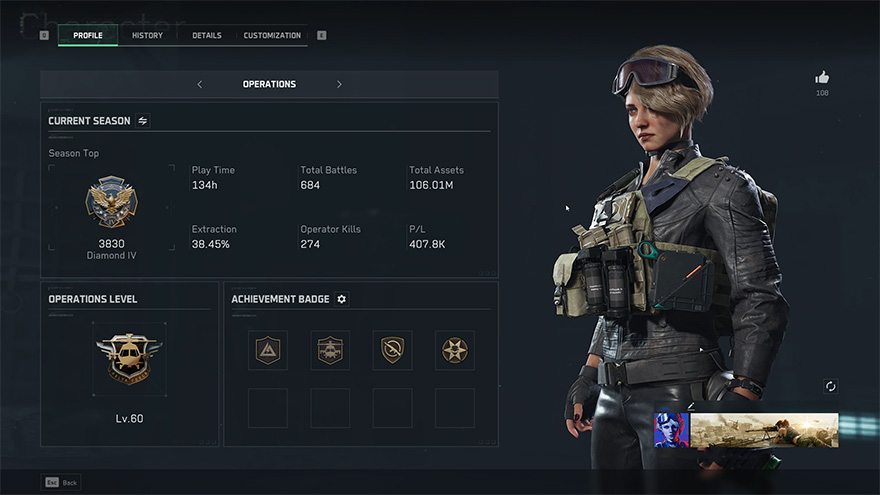
- Launch Delta Force Operations and go to your Profile page that shows your Total Assets, then capture your stash value using one of these methods:
- Keyboard shortcut: Press Shift + Right Arrow
- Stream Deck: Press your "Capture Stash" button (if configured in Step 4)
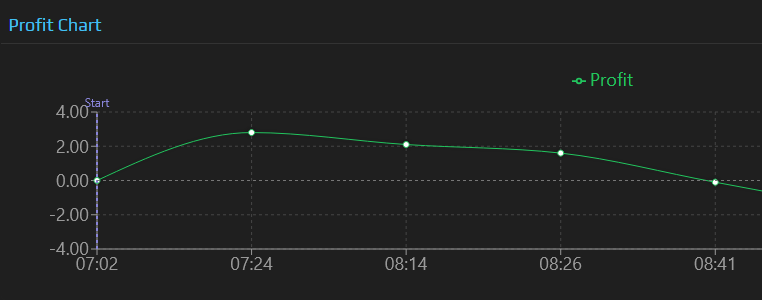
- You should now see your latest stash value updated in your page:
- Optional: If you want your profit/loss showing on your stream, you have two options:
- OBS Overlay Browser Source: follow the instructions on the OBS Overlay page to customize your overlay and add it to your OBS Scene:
- Animated OBS Overlay: Follow the OBS Animation Setup Guide here.
- OBS Overlay Browser Source: follow the instructions on the OBS Overlay page to customize your overlay and add it to your OBS Scene:
Testing Checklist:
🔧 Troubleshooting
Stats not appearing?
- Check your license file is in the correct location
- Ensure both OBS and Streamer.bot are open and connected
- Make sure Streamer.bot is running as Administrator
Keyboard shortcut not working?
- Make sure Streamer.bot is running as Administrator - this is required for hotkeys to work while a game is in focus
- Verify the hotkey trigger is enabled on the "Capture Stash Value" Action in Streamer.bot
- Check that Streamer.bot is connected to OBS (check the OBS tab in Streamer.bot)
Stream Deck button not working? (optional feature)
- Check Stream Deck software is connected to Streamer.bot (open Stream Deck software and verify the Streamer.bot plugin shows as connected)
- Check Streamer.bot plugin is installed in Stream Deck software
- Verify the button is assigned to the correct Streamer.bot Action
Follow these steps to set up animated stat values in OBS Studio. This creates smooth animations when your stash value and stream profit change during your broadcasts.
Requirements
- OBS Studio (version 27.0 or newer)
- GameStats Core Files already installed and working
- Gold+ license - Subscribe to unlock these features →
Create Text Sources in OBS
EasyCreate three text sources in OBS Studio with specific names that the animation script will recognize.
- Open OBS Studio and go to your streaming scene
- Add three "Text (GDI+)" sources with these exact names:
Stash Value - displays your current total assetsStream Profit - displays positive profit (recommend green color)Stream Loss - displays negative profit (recommend red color)
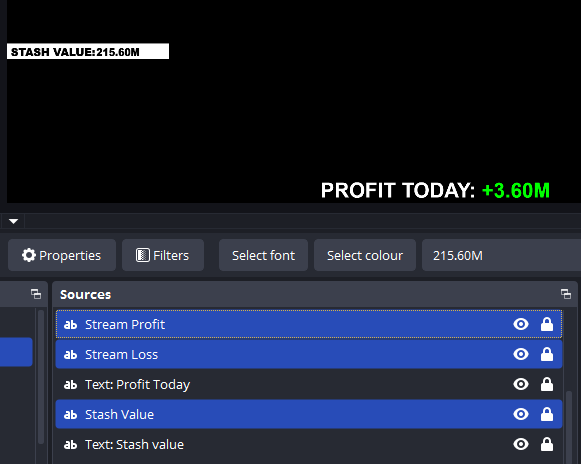
- Position the "Stream Profit" and "Stream Loss" sources in the exact same location (only one will be visible at a time - this is so that it shows a smooth transition from e.g. a negative red value to a positive green value)
- Style each text source with your preferred font, size, and colors
Important: The source names must be exactly as shown above for the script to work properly.
Download Animation Script
EasyDownload the Lua animation script that creates smooth counting animations for your statistics.
- Download the "GGWP.Live OBS Animated Values Script" from the downloads page
- Extract the
ggwp-animated-values.luafile - Copy the file to your OBS scripts folder:
Default Windows location:
C:\Program Files\obs-studio\data\obs-plugins\frontend-tools\scripts\Portable OBS:
[OBS folder]\data\obs-plugins\frontend-tools\scripts\
Install Script in OBS
EasyAdd the animation script to OBS Studio so it can control your text sources.
- In OBS Studio, go to Tools → Scripts
- Click the "+" button to add a new script
- Navigate to where you saved
ggwp-animated-values.luaand select it - Click "OK" to add the script
- The script should appear in your scripts list and be automatically loaded
Note: If you created the text sources with the correct names in Step 1, the script should work immediately with default settings.
Configure Animation Settings (Optional)
EasyCustomize how your animated statistics look and behave. The default settings work great, but you can personalize them to match your style.
- In the Scripts window, select the "Animated Stat Counter" script
- Configure the settings in the right panel
Test Your Animated Statistics
EasyTest that everything is working correctly and see your animations in action.
- Make sure your GameStats system is running (from the main setup guide)
- Start a stats session by going live or recording in OBS
- Capture your stash value using your Stream Deck button
- Watch for smooth animations in your text sources
- Test profit changes to see the color-coded animations
Testing Checklist:
🔧 Troubleshooting
Script not loading?
- Check the lua file is in the correct scripts folder
- Restart OBS Studio after adding the script
- Verify text sources have exact names: "Stash Value", "Stream Profit", "Stream Loss"
No animations showing?
- Ensure your main GameStats system is working
- Check file paths in script settings
- Try manually updating a text source value to test
Wrong colors showing?
- Check "Stream Profit" and "Stream Loss" sources are in same position
- Verify profit source is green and loss source is red
- Only one profit/loss source should be visible at a time
🎨 Customization Tips
Animation Speed
Adjust "Animation Duration" for faster (1-2 seconds) or slower (5-8 seconds) counting animations.
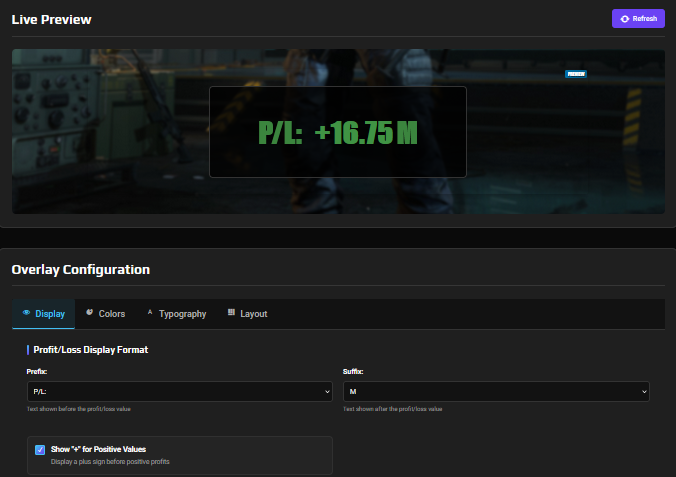
Number Format
Change "Million Suffix Text" to "M" for a shorter display, or "m" for lowercase styling.
Profit Display
Disable "Show '+' for Profit" if you prefer not to show the plus sign on positive values.
Font Styling
Use bold fonts and drop shadows on your text sources to make them stand out on stream.
Set up Stream Deck buttons that increment/decrement a counter displayed on your stream via OBS text overlay, with the current count also shown on the Stream Deck button itself.
Requirements
- OBS Studio
- Stream Deck
- Streamer.bot (installed and configured)
- Purple license - Subscribe to unlock these features →
Install Streamer.bot Actions
EasyDownload and import the Red Counter Actions into your Streamer.bot installation.
- Download the "Red Counter Streamer.bot Import Code" file from the downloads page
- Extract the downloaded file and open the
Red Counter Streamer.bot Import Code.txtfile - Copy all the text from the file (Ctrl+A, Ctrl+C)
- Open Streamer.bot and click the Import button
- Paste the copied import code (Ctrl+V) into the import field
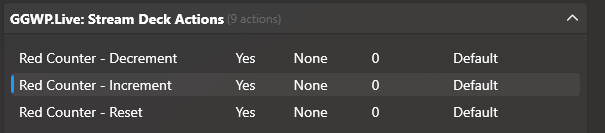
- You'll see 3 new Actions - click the Import button to add them:
- Red Counter - Increment
- Red Counter - Decrement
- Red Counter - Reset
Note: These Actions will control your counter and update both the OBS overlay and Stream Deck button displays.
Add Stream Deck Buttons
EasyCreate three Stream Deck buttons to control your Red Counter.
Add three Streamer.bot Action buttons to your Stream Deck:
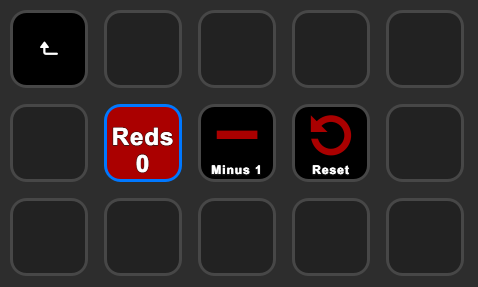
1st Button: Main Reds Counter (Increment)
- Drag the Streamer.bot "Action" to a Stream Deck button:

- Set your button styling. In our example:
- Font Size: 18 pt
- Text Color: White
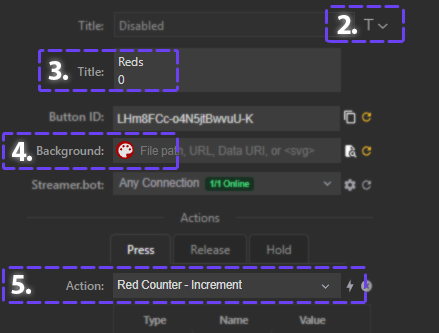
- Set the button Title to "Reds 0"
- Set the button Background Color: Red (#aa0000)
- Set the Action to: "Red Counter - Increment"
Note: If you don't see the Streamer.bot Action you might be missing the plugin - follow the Game Stats "4a. Install Streamer.bot Plugin" guide.
2nd Button: Decrement Counter
- Drag another Streamer.bot "Action" to a Stream Deck button
- Set the Action to: "Red Counter - Decrement"

- Style as desired (we recommend a minus symbol)
 (right click the image above and choose "Save image as..." to download locally and set as your Stream Deck button)
3rd Button: Reset Counter
- Drag another Streamer.bot "Action" to a Stream Deck button
- Set the Action to: "Red Counter - Reset"

- Style as desired (we recommend a reset/zero symbol)
 (right click the image above and choose "Save image as..." to download locally and set as your Stream Deck button)
Setup OBS "Red Counter" Overlay
EasyCreate text sources in OBS to display your Red Counter on stream.
3a. Create Counter Number Source
- In OBS, go to your main streaming scene
- Add a new "Text (GDI+)" source
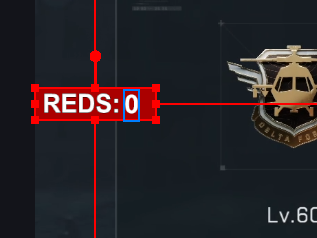
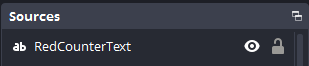
- Name it exactly: "RedCounterText" (this exact name is required for the Streamer.bot actions to work)
- Set the text to "0" temporarily to see the styling
- Configure your font styling. In our example:
- Font: Arial
- Font Style: Black
- Size: 45
- Color: White
- Click OK to save
3b. Create Title and Background
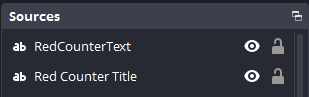
- Add another "Text (GDI+)" source (name can be anything, we used "Red Counter Title") and drag this source under your "RedCounterText" source layer
- Set the text to: " REDS: " (include extra spaces to expand the background color)

- Configure the same font styling:
- Font: Arial Black
- Size: 45
- Text Color: White
- Background Color: Red (#aa0000) or your preferred color
- Position the layers in the OBS Preview
Note: The "RedCounterText" source name is case-sensitive and must be exact for the Streamer.bot integration to work.
Link Stream Deck to Streamer.bot
EasyLink actions, buttons and OBS together.
2b. Configure Button IDs
Link your Stream Deck buttons to the Streamer.bot Actions for display updates:
- Click your Main Increment button in Stream Deck software
- In the button's action settings, copy the "Button ID" value
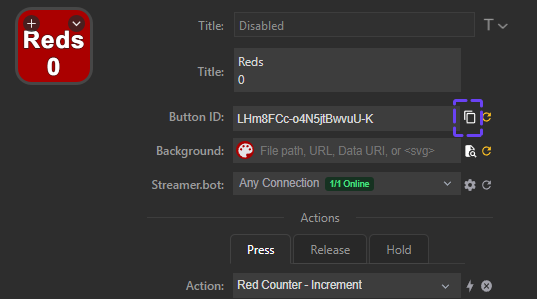
- Go to Streamer.bot, select the "Red Counter - Increment" Action:
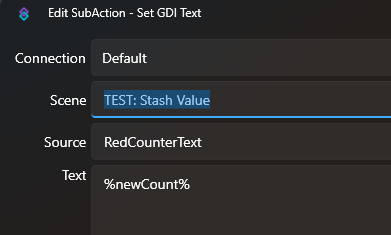
- In the Sub-Actions panel, double-click the "OBS Studio GDI Text" sub-action:
- Change the Scene to your main OBS Scene and click OK
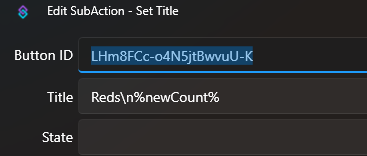
- In the Sub-Actions panel, double-click the "Stream Deck Set Title" sub-action:
- Paste the Button ID value you copied into the "Button ID" field and click OK
- Repeat the same process for the "Red Counter - Decrement" and "Red Counter - Reset" Actions:
- Update each of these two remaining Action's sub-actions "OBS Studio GDI Text" and "Stream Deck Set Title" with your OBS Scene, and your Button ID
- Add the Stream Deck button with the relevant action: "Red Counter - Decrement" and "Red Counter - Reset"
- Set your Reds Counter to reset to zero automatically:
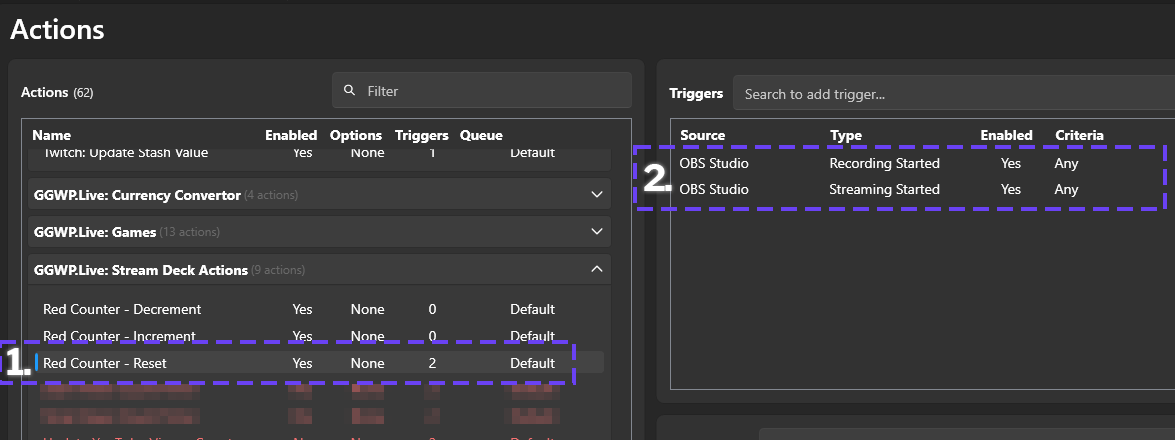
- In Streamer.bot select the "Red Counter - Reset" action and in the Triggers section add triggers for when OBS starts Streaming/Recording
- This will reset the Reds Counter to zero when you start streaming/recording
Note: Make sure you set both the OBS Source ("OBS Studio GDI Text") and Button ID ("Stream Deck Set Title") for the three actions.
Test Your Buttons
EasyVerify that your Red Counter system is working correctly.
- Make sure both OBS and Streamer.bot are running
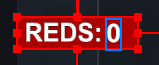
- Press your Stream Deck button labeled "Reds 0"
- The button should update to show "Reds 1"
- The OBS overlay should also update to show "1"
- Press the button multiple times to test increments
- Test the decrement button (it should reduce the count by 1)
- Test the reset button (it should set the count back to 0)
Testing Checklist:
🔧 Troubleshooting
Button not updating display?
- Check that Button ID is correctly copied to Streamer.bot
- Verify Stream Deck plugin is connected to Streamer.bot
- Restart Stream Deck software if needed
OBS text not updating?
- Ensure text source is named exactly "RedCounterText"
- Check OBS is connected to Streamer.bot
- Verify the text source is in the correct scene
Actions not working?
- Make sure all three Actions were imported correctly
- Check Streamer.bot logs for any errors
- Verify Stream Deck actions are linked to correct Streamer.bot Actions
🎨 Customization Tips
Button Styling
Customize your Stream Deck buttons with different colors, fonts, and icons to match your brand.
OBS Positioning
Position your counter overlay wherever looks best on your stream layout - corners, bottom, or integrated into your design.
Multiple Counters
You can create multiple independent counters by duplicating the Actions and using different OBS text source names.
Hotkeys
If you don't have a Stream Deck, you can assign hotkeys to these Actions in Streamer.bot for keyboard control.
Follow these comprehensive setup instructions to get your GameStats software up and running.